Did you know that a neatly tied bow can increase the perceived quality of a dress by over 40%? It’s a small detail that makes a huge impact.
For parents, creating that elegant finish for a special occasion can feel daunting. Yet, it’s an essential skill that adds charm and polish to any outfit.
This complete tutorial is designed to take the stress out of the process. You’ll learn to select the right ribbon and master a simple, reliable technique.
The result is a flawless, professional look that turns heads. Whether it’s for a flower girl or a casual sundress, the method works for all sorts of dresses.
With a little practice, crafting a beautiful bow becomes second nature. You’ll gain the confidence to dress your child for any memorable event.
Let’s transform that ribbon into a picture-perfect accent that completes the ensemble.
Key Takeaways
- A well-executed bow dramatically enhances a garment’s overall appearance.
- Mastering this skill is valuable for parents preparing children for formal events.
- Choosing the correct ribbon is a foundational step for success.
- Consistent practice makes the tying process easy and quick.
- The techniques shown here adapt to various styles and occasions.
- Following a clear guide builds confidence and ensures great results.
Introduction to Bow Tying
A beautifully crafted accent remains a timeless hallmark of special occasion dressing. For years, this signature detail has elevated children’s formal wear. It adds that final touch which completes an entire outfit.
Mastering this skill is particularly valuable for important celebrations. Weddings, holiday gatherings, and first communions demand attention to appearance. A well-executed finish shows care and preparation.
Overview of Bow Styles and Trends
Today‘s styles range from classic and understated to dramatic and voluminous. Each variation serves different aesthetic purposes. They complement various dresses designs beautifully.
A formal event might call for a structured, symmetrical look. Casual gatherings allow for a softer, more relaxed approach. Understanding these differences helps you choose the right style.
Why a Perfect Bow Makes a Difference
This embellishment creates a focal point on garments. It draws the eye to the waistline, creating a flattering silhouette. The overall appearance of the outfit is significantly enhanced.
It’s not just about functionality. A polished, intentional look demonstrates attention to detail. When every element matters, this finishing touch doesn’t go unnoticed.
Essential Materials and Preparation
Before your fingers even begin to loop the fabric, a bit of planning ensures a polished result. Gathering the right supplies and setting up your space makes the entire process smooth. This stage is all about setting a strong foundation for that elegant finish.
Choosing the Right Ribbon or Sash
Selecting the perfect ribbon is crucial. Materials like satin or taffeta are excellent choices. They hold their shape beautifully and offer a luxurious look.
Consider the length you’ll need. You want enough material for full loops and elegant tail pieces. A good rule is to have the ribbon be about three times the waist measurement.
One key tip: check if your ribbon is two-sided. A two-sided sash shows a finished look on both faces. This is common for formal garments.
Prepping Your Dress and Workspace
Start by laying the dress flat on a clean surface. If the child is wearing it, have them stand still. Ensure the sash is straight and free of wrinkles.
Position the ribbon around the waist area where you want the bow to sit. Adjusting later can mess up the shape. Good lighting is essential to see every detail clearly.
With everything organized, you’re ready to create a flawless accent. Proper prep prevents frustration and leads to success.
Understanding the Basics of Bow Tying>
Every stunning bow begins with a clear understanding of its fundamental parts. Knowing what to call each element makes following any guide much simpler.
This foundation turns a confusing tangle of ribbon into an intentional, beautiful accent.
Key Techniques and Terminology
Start by identifying your two ribbon ends. Many guides label them side A and side B for clarity.
The first knot is crucial. It should be firm enough to hold but not crush the fabric.
Next, you form the loops. Think of this like tying your shoes, but with more care for appearance.
One loop comes from each side, crossing over to create the classic shape.
The hanging ends are called the tails. Aim for them to be even for a balanced look.
Following these basic steps builds muscle memory. Soon, the process feels natural.
Refer to a visual tutorial if you need help picturing each movement.
With practice, you’ll tie a symmetrical bow every time. The right technique ensures a polished result that lasts.
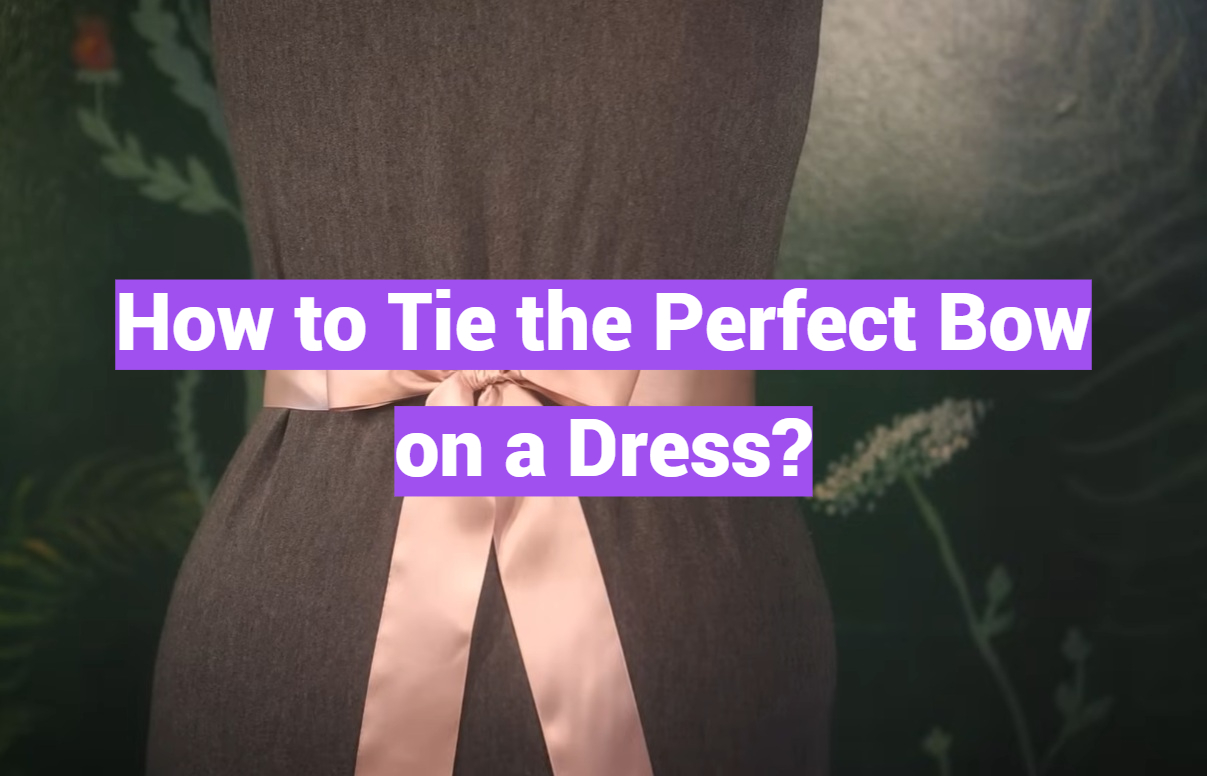
How to Tie the Perfect Bow on a Dress?
Ready to create that picture-perfect finish? It all starts with aligning your materials correctly.
Step-by-Step Instructions
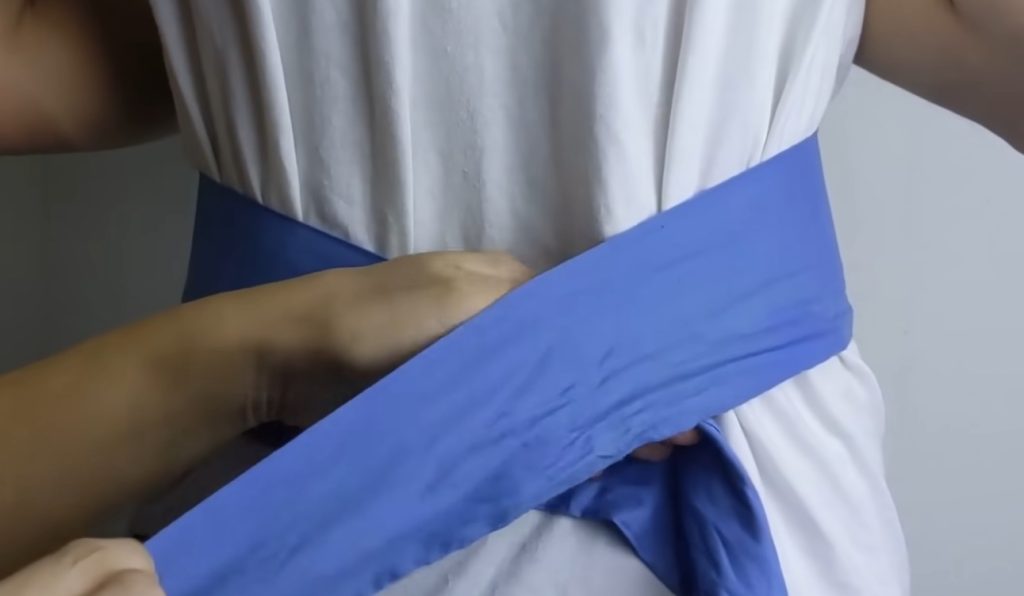
First, position the ribbon around the waist. Line up both sides, labeled A and B, so they are straight and smooth.
Bring side A to the right, crossing it directly over B. This forms an X at the center.
Take side A under, behind, and up over B. Pull it through to create a snug foundation knot.
Now, fold the excess part of B upward to form your first loop. Hold it securely in place.
Guide side A up, behind, and around that first loop. Thread it through the opening to create the second loop, just like tying shoelaces.
Ensure both sides of the ribbon remain untwisted. Gently pull the loops in opposite directions to tighten the center.
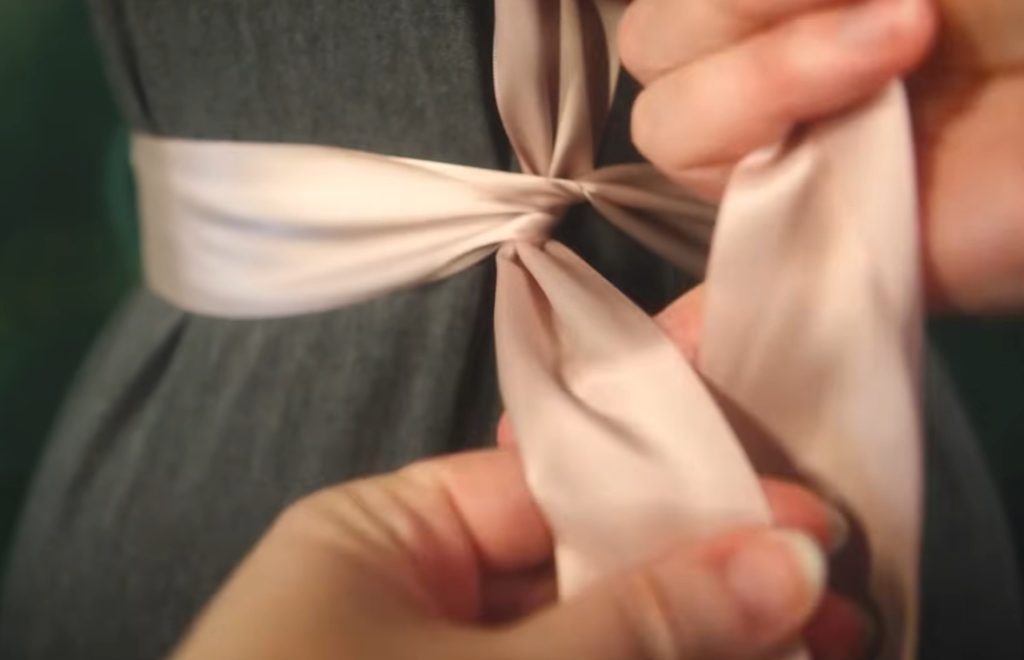
Tips for Adjusting Loops and Knot Tightness
If your creation looks lopsided, don’t worry. A simple adjustment technique fixes it.
Slightly pull the hanging tails to loosen the center. Then, pull on the loop portions to tighten again while repositioning.
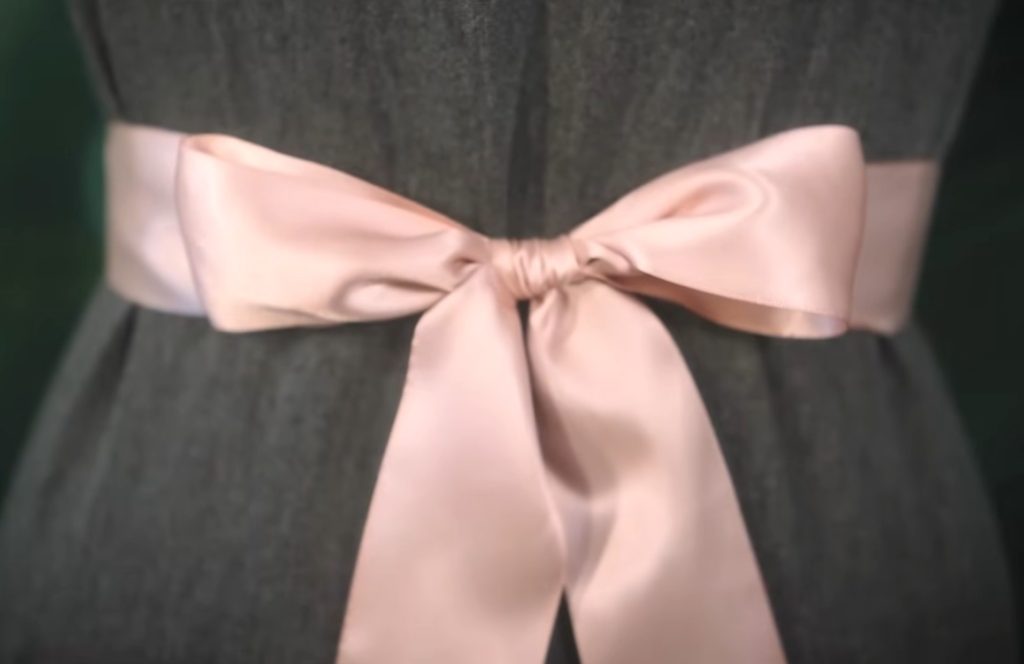
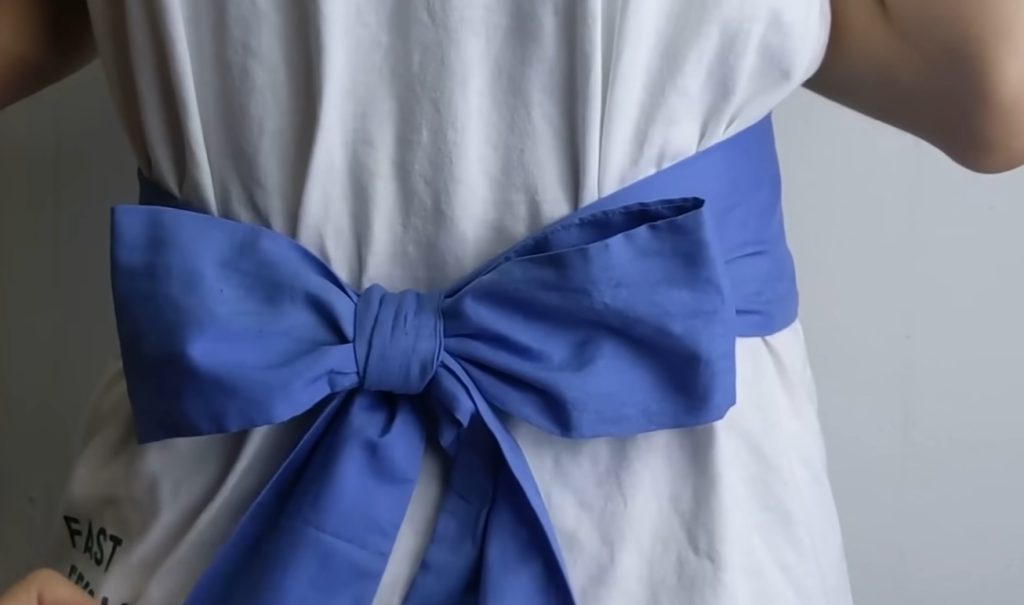
Symmetry is not about perfection, but about balance. A small tweak can make all the difference.
Straighten the excess tails so they hang evenly. Finally, fluff the material of the bow to give it a full, round appearance.
| Issue | Common Cause | Quick Solution |
|---|---|---|
| Uneven Loops | One side pulled tighter than the other | Loosen the knot and re-pull each loop separately |
| Flat or Crushed Bow | Over-tightening the center | Gently expand the loop material with your fingers |
| Twisted Ribbon | Not keeping sides straight during step five | Untwist the ribbon before final tightening |
Video Tutorial and Visual Guidance
Mobile, Alabama retailer Eva’s House shares an invaluable video resource for parents. Sometimes, written steps need a visual companion to truly click.
Watch and Learn: Visual Step Demonstration
This helpful tutorial comes from a shop with years of experience. They specialize in preparing children’s outfits for special events.
The video features a lovely dress from The Beaufort Bonnet Company. Its simple, elegant design acts as the perfect canvas for a bow.
You can see the hand movements and rhythm in real-time. Pause or rewind to catch every detail as you learn.
| Aspect | Visual Guidance | Written Instructions |
|---|---|---|
| Understanding Motion | Shows hand placement and flow clearly | Describes movement, which can be abstract |
| Correcting Mistakes | You see what a proper loop looks like at each stage | Relies on your interpretation of the text |
| Learning Pace | Control playback speed for your comfort | Requires you to set your own reading pace |
| Subtle Details | Highlights ribbon tension and shaping visually | May not convey fine nuances as effectively |
Observing these subtle details is particularly valuable. It makes the difference between a good accent and a perfect finish for the overall look.
Tips for Tying with Two-Sided Sash and Adjusting Symmetry
The secret to a perfect bow on satin lies in a simple twist before the final loop. Formal sashes are often two-sided. This differs from a regular bow.
One side of the ribbon is smooth and finished. The other shows a stitched fold edge, or back. You want the pretty side showing.
Managing the Excess for an Even Look
Start by placing the sash evenly at the waist. Check both the right side and left side are level.
Before you tighten the knot, manage the hanging pieces. Ensure they are equal in length. Gently pull more ribbon through one end if needed.
Displaying the Correct Sash Side for a Flawless Finish
Here’s the key technique. Before creating your second loop, twist side A over. This exposes the inside, stitched back of the sash.
Now, bring that side around the first loop to form the second. This twist ensures the smooth side shows on all loop side pieces and tails.
Only the center knot will show the back. Check your work from all sides. This guarantees a symmetrical, polished look.
Troubleshooting Common Challenges
Many creators encounter similar hurdles on their way to achieving a balanced, elegant finish. Don’t be discouraged if your first attempt isn’t perfect.
Most issues have simple fixes. A little patience and know-how will solve them quickly.
Fixing a Lopsided Bow or Uneven Loops
An uneven bow is a frequent challenge. If one loop is smaller, gently pull it while holding the center knot.
This draws more ribbon into that side for balance. For a tilted accent, loosen the knot by pulling the tails.
Reposition the entire piece at the waist. Then, retighten by pulling both loops together.
This adjustment tip works every time. It ensures symmetry without starting from scratch.
Avoiding Over-Tightening and Maintaining Comfort
A secure knot shouldn’t feel tight. Over-tightening crushes the loop material and causes discomfort.
The dress should sit naturally. Check that the child can move freely.
If tails are uneven in length, loosen the knot slightly. Pull more ribbon through one end until they match.
Slippery fabrics may loosen over time. Tie the initial knot a bit firmer for security.
A small safety pin on the back can also help. It keeps everything in place discreetly.
| Issue | Common Cause | Quick Solution |
|---|---|---|
| Uneven Loops | Pulling one side tighter than the other | Hold the knot, gently pull the smaller loop |
| Flat Appearance | Over-tightening the center | Loosen slightly, fluff the loop material |
| Slipping Ribbon | Smooth fabric with little grip | Tie a tighter foundation knot or use a pin |
| Persistent Problems | Multiple small errors compounding | Untie completely and begin the steps again |
Sometimes, starting over is the best tip. Smooth out the ribbon and try the steps once more.
Practice makes the process intuitive. Your skill will grow each time you tie one.
Share your experiences with other parents. Learning from each other saves frustration.
Conclusion
This versatile technique proves valuable far beyond formal wear. Many use it for gift bags and sealing cookie bags. Your new skill creates a polished look instantly.
Well done on finishing this tutorial. You can now tie a lovely bow for any dress. The core steps and knot remain the same each time.
Practice over the coming years will make it effortless. Share the guide with friends preparing for an event. Adjust pieces on each side for symmetry.
These methods work for decorative bags and packages too. Over times, you’ll craft a perfect bow in moments. The skill lasts for years, through many special occasions.
Keep this reference handy for future dresses. The right ribbon makes all the difference today. You’re ready to handle any bow-tying challenge with ease.